

Crafted In Florida

The Design
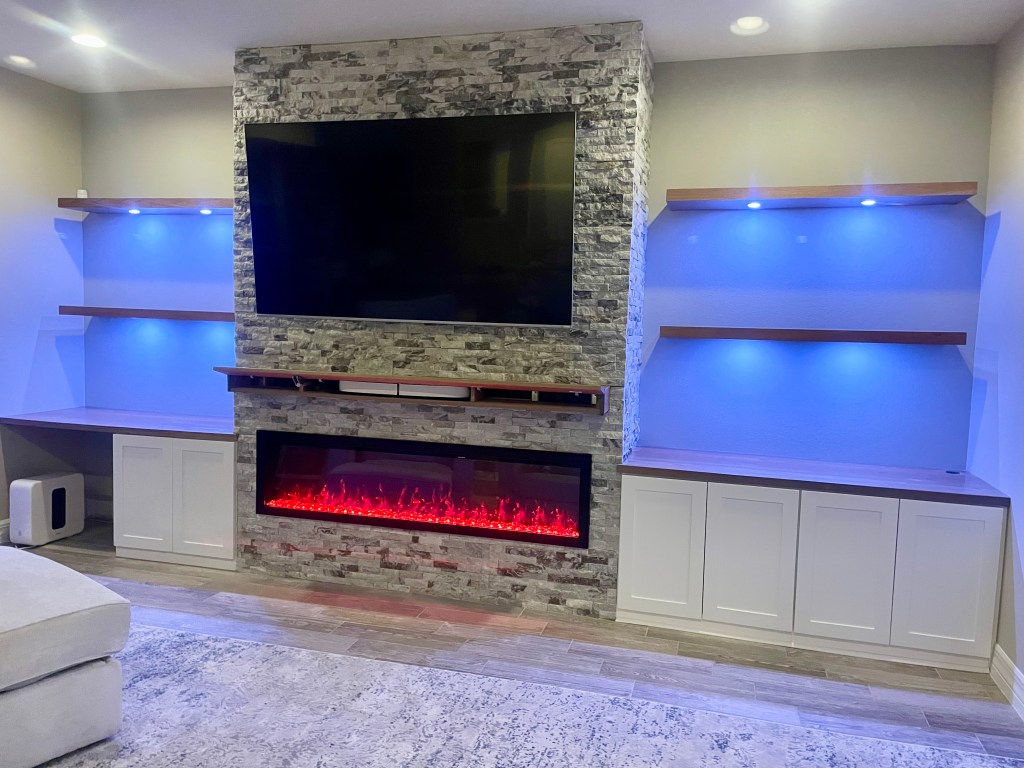
This project was a fun from the planning process. The plan started with something that I’ve done many times before; stone fireplace with mantle, floating shelves on the sides and custom cabinets on either side. I’ve done several projects like this in the past, but this one took a turn when we got to discussing where to install the sound bar. The sound bar is not your typical thin sound bar, it was about 12” deep so it wouldn’t mount under the tv and they didn’t want to take up all the space on the mantle. So I came up with the idea of installing it inside the mantle. The plan was to have the mantle open up, but then I thought why not have it open via remote? The client loved the idea, she also mentioned that she wanted to lock one of the cabinets, because she was going to use it as a liquor cabinet. The thought of using a RFID or keycard lock instantly sprung to my mind. Again the client loved the idea. Now it was time to figure out how to make all of these ideas become a reality.
The Process
This build started with the custom cabinets, for details on how I build custom cabinets check out my previous post or my YouTube channel for a simple “how to” video. (https://youtu.be/AkiEwQEOIkU). There is also a video on how to make the doors as well (https://youtu.be/xCehyMitqk4). The next thing to do was to make the floating shelves. For the floating shelves I begin with some S3S white oak. S3S of course meaning from the distributor it comes with a flat top and bottom and one straight edge. I first rip the boards down to the thickness of the shelves. These pieces are then receiving a rabbet on the top and bottom and then are mitered to create the three sides of the face of the shelves. I then cut down some white oak plywood to fit in those rabbets and finish off the top and bottoms of the shelves. The bottom of the shelves also received two holes that would fit the puck lights.
The shelves now ready for sanding, I turn my attention to the mantle. This mantle needs to open via remote so I begin with the carcass, the top, bottom, and sides are cut and glued together. I add a couple of spacer blocks on the inside of the mantle to keep the center from sagging. The next thing to is to get the face of the mantle to open and shut. I add some frameless cabinet hinges that are full overlay. Once those are installed (which was no easy feat, a 90 degree angle driver came in handy), the next step is to get the linear actuator wired up. With the actuator wired it gets mounted inside the mantle and then the front is attached to the face of the mantle. From that point most of the shop work is complete and it’s just time to sand, stain, and finish everything.
Install begins with the cabinets being installed and the countertops cut to size and scribed to the wall. Next is the framing, framing is simple 2×4 framing and attached to the wall. It’s important to leave space for the fireplace and an opening where the mantle will be. Framing should be 16 inches on center when possible, but I typically try to make sure the studs end up where I need them to be for cement board and for the tv to be hung on the studs. I then am sure to test fit the fireplace before adding the cement board, always test fit before you get too far down the road. Before I add the cement board I add framing for the floating shelves and run the wires behind the drywall and behind the fireplace. Once those are ready we then add the cement board. Once the cement board is up it’s time to prep the stone. Mortar meant for large tiles and stone should be used to apply the stone to the cement board. I like to add the thinset to both the wall and back of the stone, and then make sure to get a good connection.
A good wet saw and a grinder with a diamond plated wheel on it are essential for this type of job. Cutting the pieces to fit around the fireplace and mantle will take some careful measuring and planning. I typically screw on a board that supports the stone over the fireplace opening until it sets. I’ve also found a very important thing to consider is when you are picking the stones for the pieces around the fireplace that they are even thickness so that when you install the fireplace it fits correctly. Once all of the stone is attached and set into place, the fireplace and tv can be installed. The piece really comes together nicely, floating shelves, custom cabinets with white oak countertops, key card lock on the cabinet, and a remote-controlled opening mantle. This piece was a fun project to work on and the customized hidden features were fun to work on. I hope you enjoyed reading how this piece was built and if you did subscribe to the email list and YouTube channel.
Discover more from CRAFTED IN FLORIDA
Subscribe to get the latest posts sent to your email.
