

I am pretty good at building many things, but I’ve never been a fan of drywall. If there is one thing that I’ve had to go back and fix or had to discount a project on it’s been drywall. In fact I had a job not long ago that I had to heavily discount the total because I couldn’t get the drywall up to an acceptable standard. I don’t like it and try not to take on any drywall jobs. I had one more on the books already and was thinking about subcontracting it out because after the last one I was defeated. Then I went to YouTube University, something I should have done ages ago for this issue, and I figured out why I sucked at drywall.
In the end it was just a matter of viscosity, I had been leaving the mud too thick when trying to apply it. Whether it was premixed mud or even the powder I had been using it at a more peanut butter like consistency, when I should have thinned it down to something more like a Wendy’s Frosty like thickness. Simply adding a little more water to the mix supposedly made creating a smoother finish much easier. With this knowledge I went to work on my next drywall job with optimism, but still with a little hesitation.
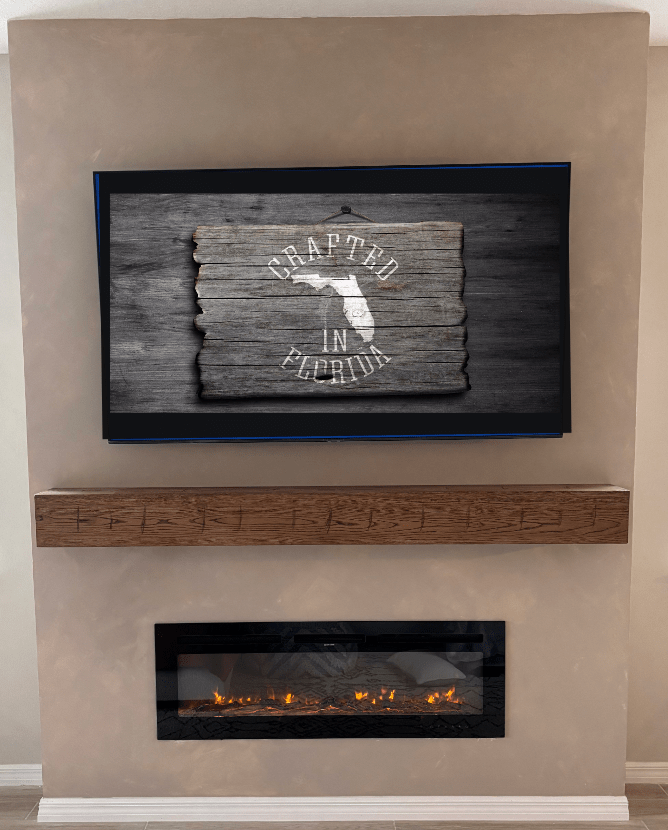
This project was a simple concept, a bump out of about 12”, 7ft wide, floor to ceiling, drywall, flat texture, fireplace, and a custom mantle. The only thing that was new was the lime wash technique that the customer had requested for the paint job. The framing is simple, 2×4’s for a non load bearing wall, buying the 12’ drywall allows for the pieces to go floor to ceiling with only needing to tape one seam in the middle. Corner bead on the two outside corners and because the existing drywall looks like the hills of Tennessee, I added some tape to the inside corners where the new wall meets the old wall. Cut out the hole for the fireplace, make sure to add the framing where the tv mount will go and a little cut out for the outlet and place to hold the apple tv.
Now that the easy part was done it’s time to test this technique that I’ve been getting wrong for years. I started with premixed mud, added some water and mixed it in until the mud looked like a wendy’s frosty. I began applying the mud to the seams and it was incredible the difference it made. The putty knife just glided across the drywall, creating smooth lines of mud like a perfectly buttered biscuit. The relief that swept over me was immense, I couldn’t believe that something so simple had evaded my mind. After a few minutes of throwing mud on the wall the first coat was done. It looked good, smooth, like someone with years of experience had completed this job. Now it still required what I would consider to be a significant amount of sanding, so by no means was it perfect, but it was good. The second coat went on even easier with the 10” putty knife. I was feeling confident going into what was going to be the final coat, something I hadn’t done before, the skim coat.
A skim coat is a full coverage coating of the wall, this is done with a large, typically at least 2’ wide putty knife. While it was a new technique I was still feeling confident with my recent experience of the last two coats. The skim coat I found is fairly simple, the trickiest part is to avoid the lines at the end of the putty knife. You want to apply enough pressure to smooth out the mud, but not too much that you are digging into the mud with the edge of the knife. There is a lot of feel you have to figure out in drywall, which is why most non drywallers consider the best to be artists. Those guys usually have very minimal sanding to do when the mud dries. That’s where you want to get to, us average folks have to sand so much the floor looks like Pablo Escobar just came through.
Once the drywall was smooth and ready for paint, I threw a coat of primer on it and got ready for the limewash. This technique was another one that I hadn’t done before, but seemed like a simple idea. Essentially it’s a little bit of lime mixture with the paint to give the paint a thicker consistency and will add texture to the paint. Then you paint it on the wall like you’re 3 years old. Ok, there is a little more to it than that, but it felt like I was painting like my kid just brushing it all over the place. The idea is you paint and area and as your brush strokes have less paint on them you stretch those as far as you can, then you paint another “cloud” a little further away from the first one and as you fill in those areas you want it lighter in spots and darker in spots. This gives the wall depth and makes it look like there is more to it than just paint. Plus the lime mixture will add texture to the paint to give it even more character. Lime is a naturally substance that is derived from limestone, it is used often in agriculture to improve soil ph levels by neutralizing acidity and making the environment better for plant growth. It adds calcium and magnesium to the soil. They sell premixed pieces for paint, but it’s just ground up lime mixed with water and then added to the paint.
Now that all of the artistry is done I could add the custom mantle that I built, install the tv and fireplace, and trim the bottom with baseboard. This project was fun, getting a little out of the norm and figuring out something that had given me trouble in the past. It’s important to always try to find a solution to the issues you have. There is almost always a way to solve the problem and in today’s world there are so many resources to find those answers.
Thank you for reading this article, be sure to subscribe to the news letter to get new articles sent directly to your email inbox. Also follow us on social media, @Crafted_in_Florida on all socials. If you’re interested in a custom build click here and fill out the request form.
Discover more from CRAFTED IN FLORIDA
Subscribe to get the latest posts sent to your email.
