
There is something that has to be done on every project that nobody that I’ve ever met likes to do. The thing about it is, it’s basically the make or break task for the entire project. If you skip this step or do it incorrectly the finished product will show it, but.. If you nail it? You will look like a master carpenter, a wood whisperer, or the ultimate craftsman! What is it you ask, sanding. Sanding is one of the most important, yet least desirable things you do as a woodworker, carpenter, or DIY guy who’s trying to save money by building that thing his wife was going to spend $1000 on.
Sanding is boring, it’s repetitive, and all around mundane. Despite all of this you can take a page out of my book and find something productive or fun to keep you occupied while knocking out this task. I began investing in audiobooks last year (https://amzn.to/3CuL09F : audible sign up link) and I really feel like I’ve been able to get more out of the process. The reason I can listen to the audiobooks and work at the same time is because I know the sanding process. The rest of this article is to give you the process so that you can enjoy an audiobook or a podcast too!
Step 1: Ensure your surface is clean, make sure that there are no large globs of glue squeezed out or loose pieces of wood on the board. These things can either damage the wood or waste your time trying to sand through them. Wipe it off and for the glue a hand plane or a chisel should allow you to trim that glue down to the surface. With a clean surface, it’s time to start making it smooth. Begin by taking your sander and attaching a low grit sand paper. Low grits would be considered 60, 80, even 100. This will allow you to sand out any imperfections and give you a nice even surface to work off of during the rest of the finishing process.
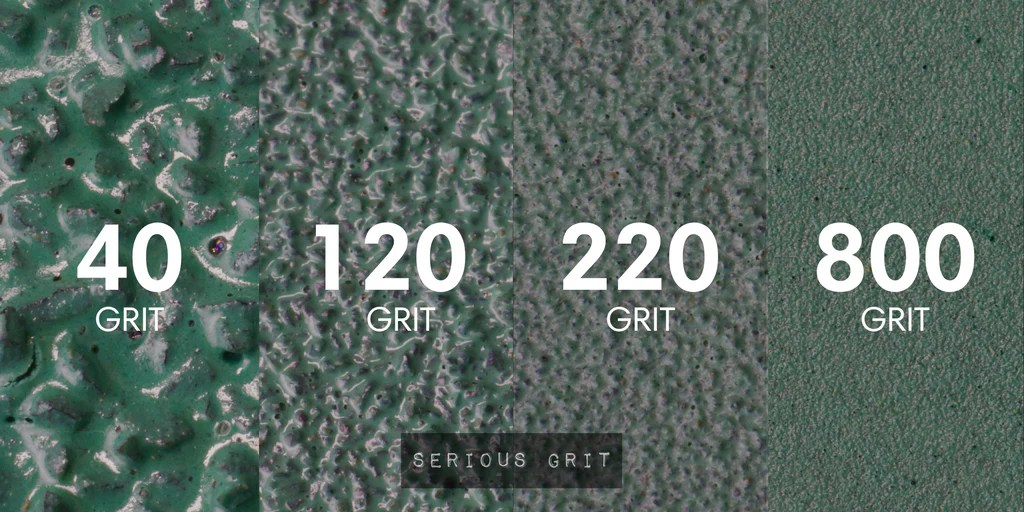
**Side Note** Grit refers to the number or either fiberglass shards or sand particles per square inch on the paper. (Most new sandpaper uses fiberglass) The less shards the rougher the paper, more shards smoother paper. We sand from rough to smooth.
Step 2: Turn on your dust collection and sander and begin sanding in a grid like pattern. This will ensure you sand ever portion of your piece. I do this by going up and down across the entire piece, then side to side across the entire piece with the same grit sandpaper. When sanding keep the sander flat on the surface to avoid creating an divots or bumps in your project. A secondary way to ensure you sand the entire piece is to lightly scribble some pencil marks across the entire piece and it will act as your indicator when there are no longer pencil marks.
Step 3: use either compressed air or a microfiber cloth to wipe down your project. Then switch sandpaper to either 120 or 150 grit and repeat the process.
Step 4: Now that you’ve wiped down the piece after the round of 120 grit, you will want to do what’s called a “water pop” This is when you lightly spray the piece with water, preferably out of a spray bottle in more of a mist setting than a jet setting. The water pop does 2 main things that help you. First, by making the wood wet any imperfections in the piece will reveal themselves. Just like when you put finish on the wood and it has the appearance of being wet the water gives you a preview of what the piece will look like when finished. It reveals sanding marks, which often come from either running the sander too fast across the piece or pushing too hard. You should be moving the sander roughly 1 inch per second, according to older and smarter woodworkers than me. The second thing that this does is raise the wood fibers, as the wood dries the fibers will stand up and you can then come in with 220 grit sandpaper and you will be knocking down all of the fibers creating a much smoother finish in the end.
Step 5: is to sand with the 220 grit, now this time we do not want to do the marks on the board because you will not be taking off as much material so you wouldn’t necessarily get through the pencil marks if you did make them. Just follow the grid pattern and go over the board at least twice.
Step 6: (If you’re not applying stain skip step 6 and go to 7) Apply whatever finish you are using. If you’re using a stain, now is the time to apply it, let it dry, then hit it with 220 lightly by hand before adding a second coat.
Step 7: Apply a coat of your clear finish. If you are using a water base, you’ll be able to sand in the recommended amount of time which would be a few hours and then recoat. After the second coat sand with high grit like 320 or 400 before applying your final coat of clear finish. Oil base finish will require longer dry times.
That is the quick version of how to sand your projects. This goes for paint projects as well, you’ll be sanding after the primer coats and between your two top coats.
Thank you for reading the article, if you found any value in this please subscribe to the email list. This will keep you informed whenever the next article comes out with the weekly newsletter. The newsletter will have the article, a news story relating to woodworking or construction, and a tip of the week. We look forward to seeing you in the Crafted In Florida Club!
Discover more from CRAFTED IN FLORIDA
Subscribe to get the latest posts sent to your email.

One thought on “How To Do It Right, The Thing That Nobody Likes!”