
Most newer homes that I am in these days seem to have one thing in common; a wide open living space with a large blank wall. This large blank wall is where you’re supposed to gather around for big tv events, holidays, and sporting events. Nothing says Christmas morning like huddling up next to the drywall and the fire playing on the tv. Nobody really wants this, which is why I get so many requests for built-ins with the fireplace added. Now this is still Florida and even in the depths of winter you may want a fireplace about 5-7 days out of the year. So most of my customers opt for the electric fireplace, it’s a much more economical option with a ton less maintenance.
My latest customer had an electric fireplace already, and she had bought it with the little mantle kit that came with it. She just wasn’t really much of a fan of it, the entertainment center they had didn’t allow for the piece to be in the main living area and it didn’t really match with her style of traditional craftsman/farmhouse look. So she reached out to me wanting to change this, she wanted storage, display space, brick around a fireplace and a mantle. So I made it happen.
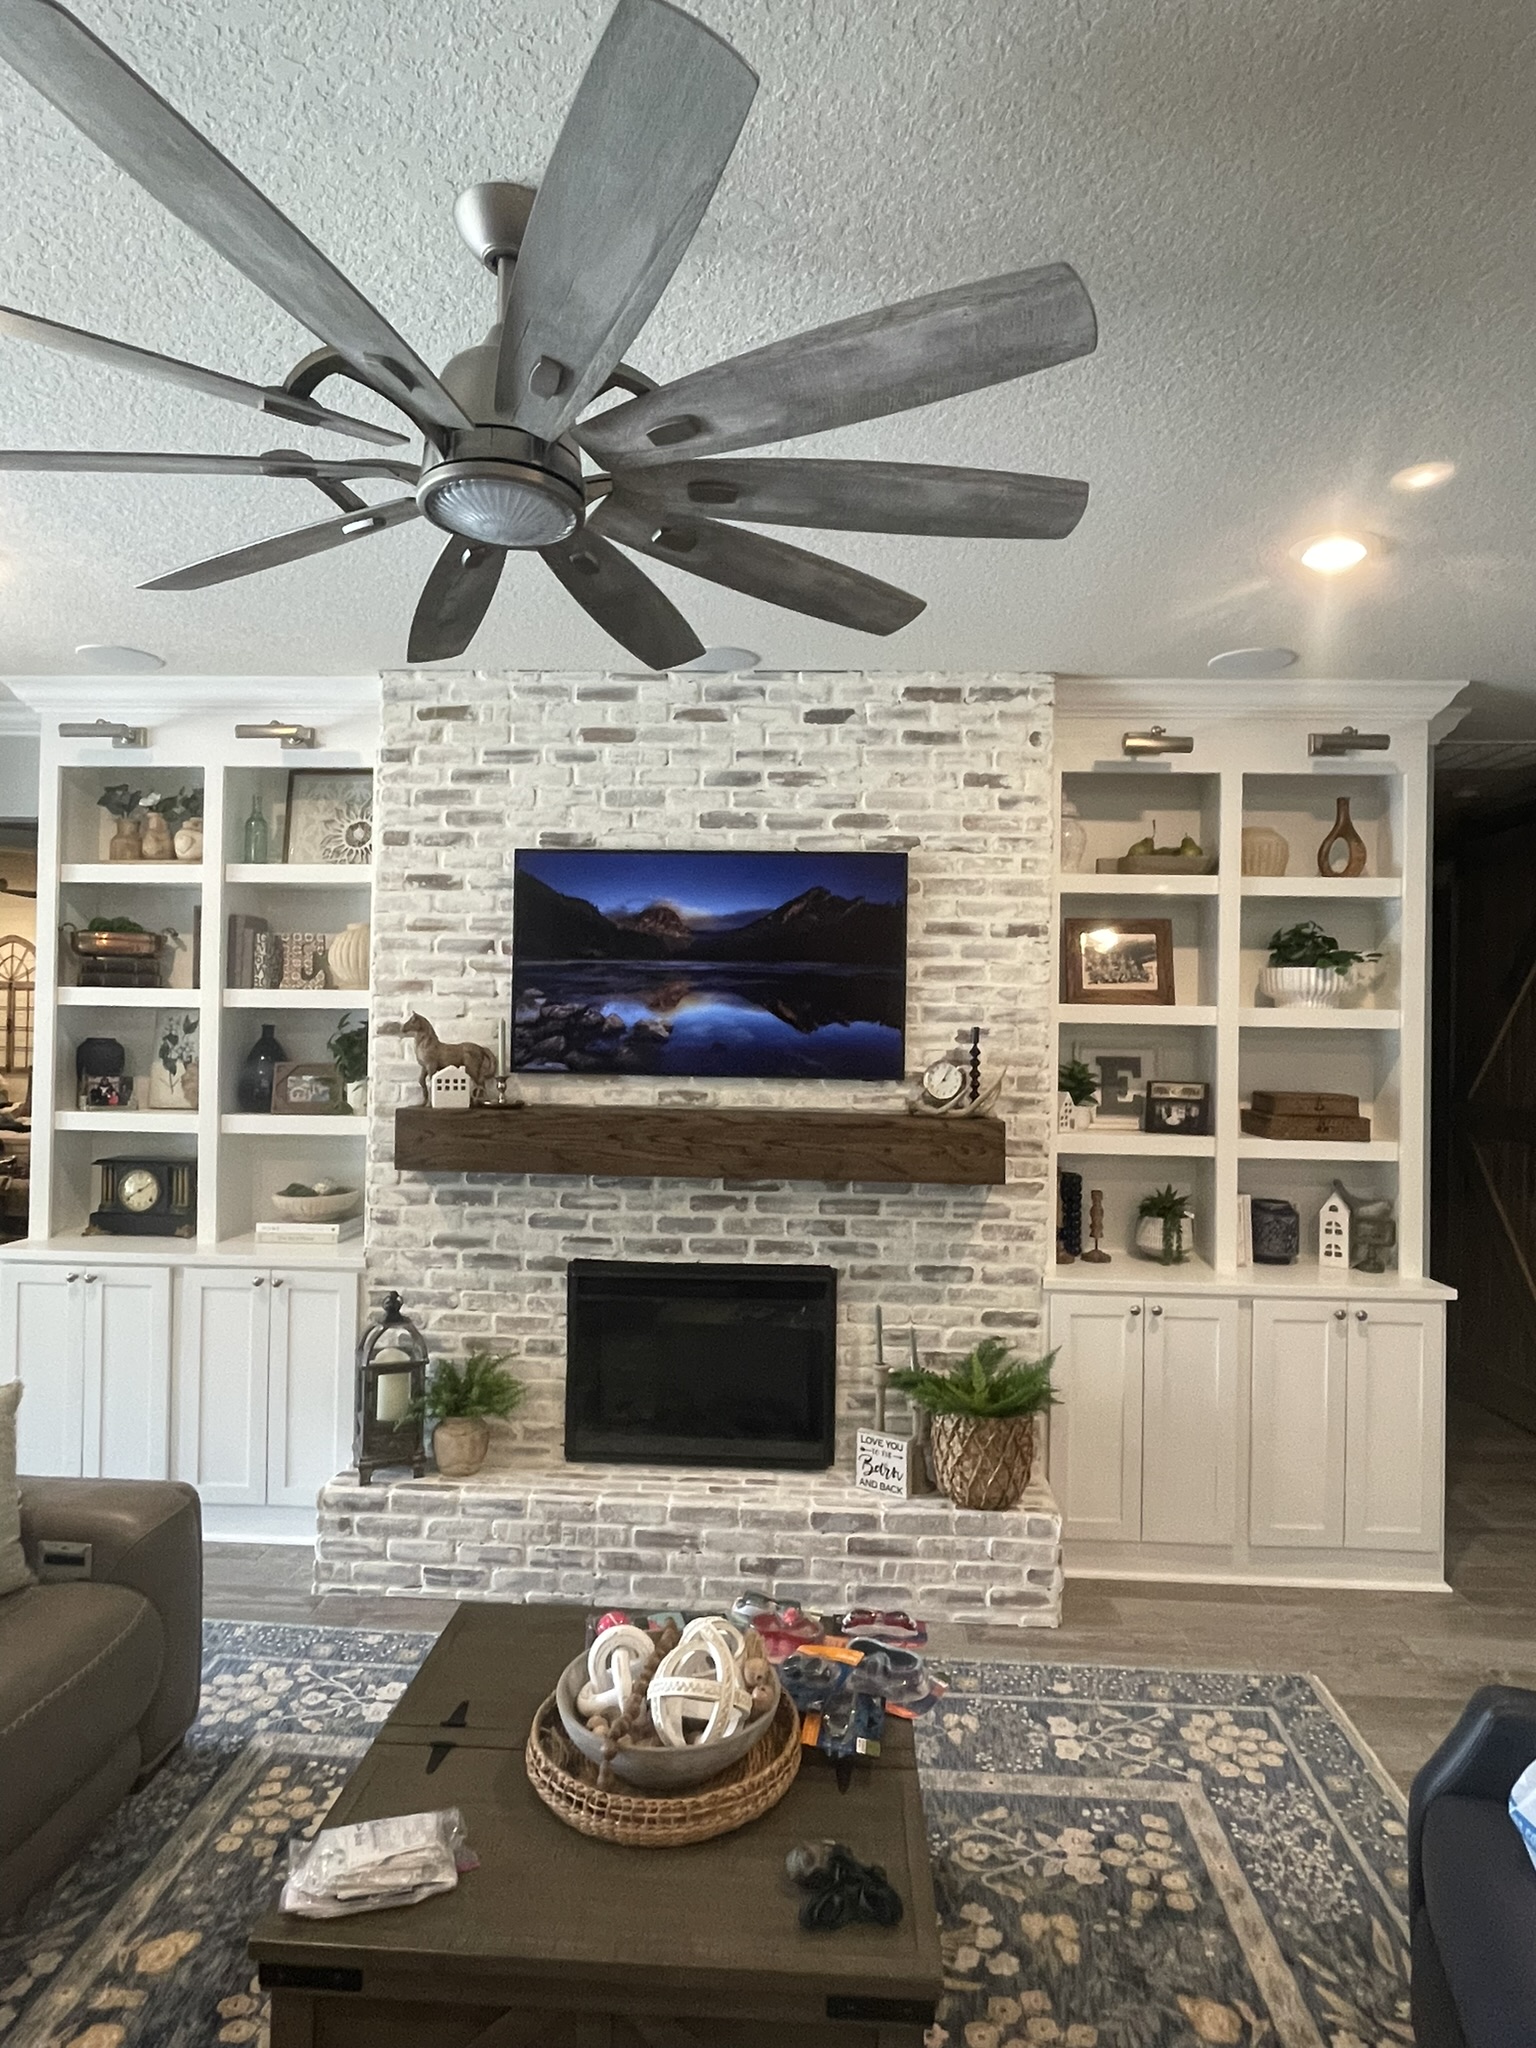
This piece was going to be pretty large with a final measurement of 15’ wide and going floor to their 9’ ceilings. A pair of base cabinets, open shelving above, and the brick veneer on the fireplace and the hearth. The entire piece began with the cabinets, with my new CNC machine I programmed it to cut out a pair of cabinets measuring 4’ wide and 18” deep. It went pretty smooth, considering this was one of my first projects using the cnc for cutting out the cabinet parts. The cabinets would be divided in half with the face frame so that we could put 2 pairs of doors on each cabinet. (Link to video on how I build custom cabinets without a CNC)
The uppers would also be divided in half to give more of a cube look so there were more spaces for different types of decorations. The construction of these cabinets was simply ripping the ¾” unfinished birch into 11-¼” strips, adding a top and shelves to it and then a face frame to really lock it into place. The one unique piece about this was that the customer wanted to add lights above the shelving units so we needed to leave space in the face frame for that to happen. All of this was repeated for the other side of the unit.
With the cabinetry prepped for paint, I turned my attention to the mantle. I built this mantle like I build all my other mantles (link to video on how I build custom mantles), except I needed to make sure the inside of this mantle stayed clear as we were adding a drawer inside the mantle. Once I assembled the mantle I made a drawer box 1 inch shy of the width of my inside measurement of the mantle. This inch would allow for the drawer slides to fit inside of the mantle and not be seen when the drawer is closed.
Once on site I could frame out the fireplace with simple 2×4 framing. I calculate this measurement by starting with my final width, subtracting the thickness of the brick, thickness of the cement board, and doubling that because both sides of the fireplace will have those materials. I then cut my pieces to size, use 3 inch screws to secure it together and manhandle it into place without breaking anything. (not a simple task as a solo contractor). Once I have it in place I take the width of the fireplace and mark that centered on my piece. I then can start framing everything out. Something I have to keep in mind on this project is that with the mantle having a drawer I have to leave that entire space (about 6’) open for the drawer to be able to easily slide in and out. Because of this I framed out the bottom portion, then added more framing above the mantle.
Once the framing was complete I could place my cabinets in place to make sure everything lined up and was square, then once all of that was checked I could add the cement board. Cement fiber board is a solid backer board meant to hold thinset and tile, or in this case brick veneers. The veneers go up pretty smooth as they come in sheets that are about 2 square feet and any time a piece needs to be cut, it’s easy enough to simply pull that brick piece off of the sheet go out to the tile saw and cut it appropriately and bring it back in, butter the back and set it in place.
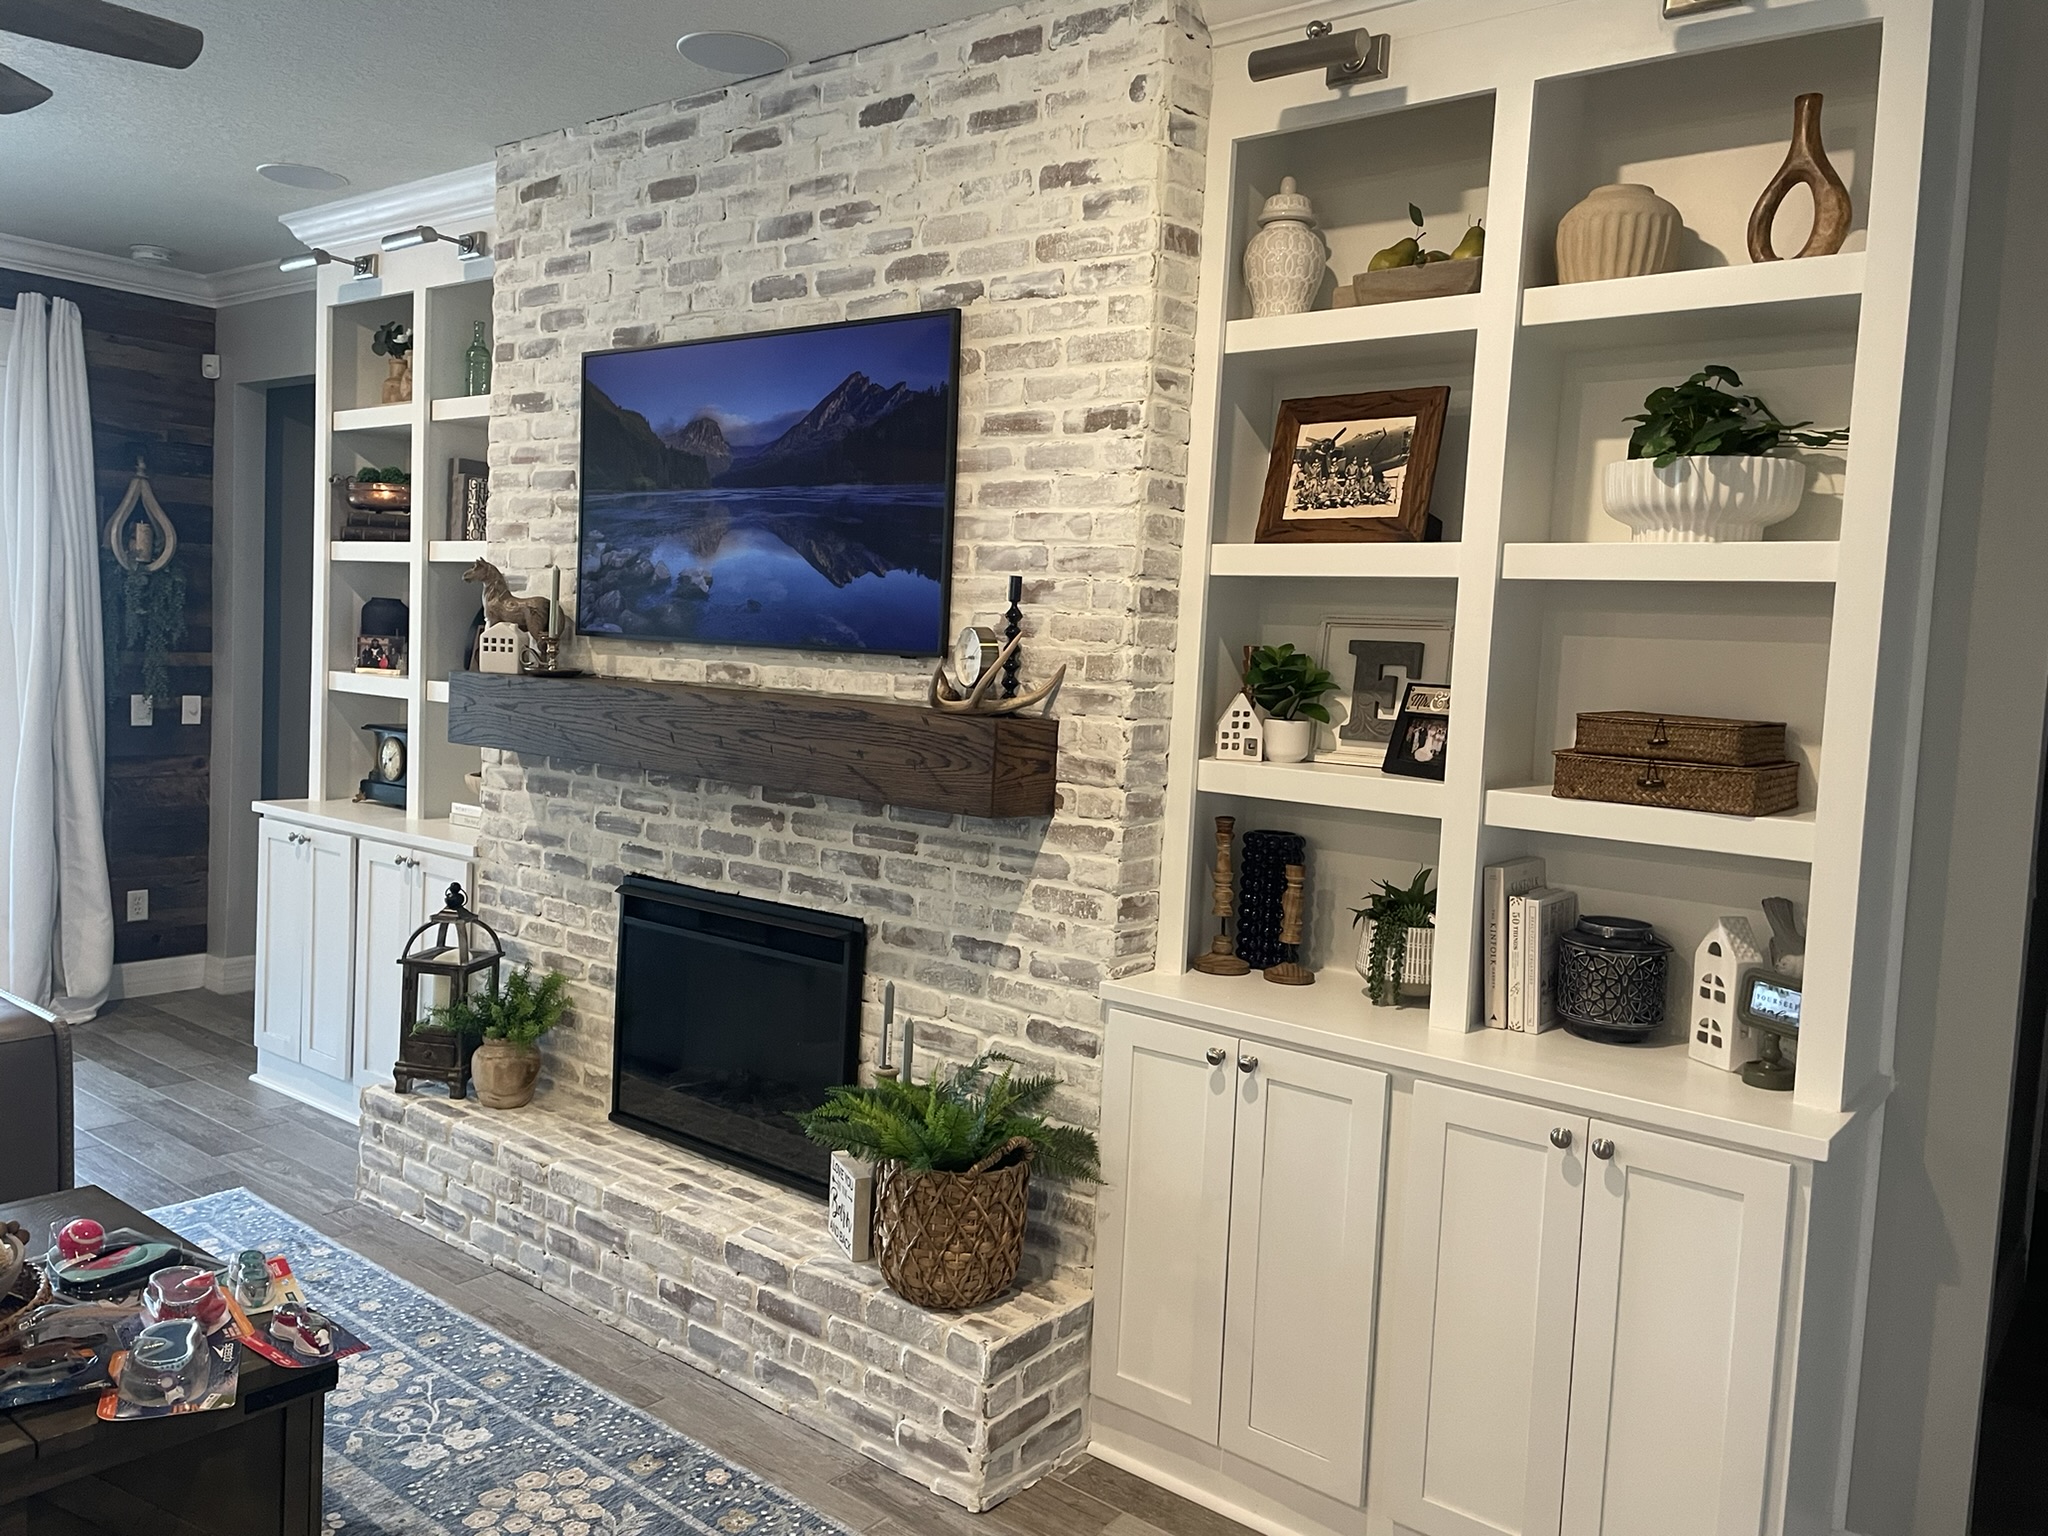
The brick goes up in about a day and a half then the German schmear happens. This technique is done by taking mortar and mixing it up and smearing it all over the brick. This is a dealer’s choice type of project as you can add it as thick or thin as you like and you’ll have a bucket of water and sponge next to you to clean up as much or as little as you want. This is a great way to get a more permanent white washed look, without any paint.
With everything finished up and dried I could install the mantle, this began with installing the drawer with the slides, like you would any other drawer (even though this one was 6’ long). Then the mantle could be attached to the drawer and slid into place. I did also add a bluetooth controlled lock on this mantle drawer so they could hide whatever valuables they wanted in there without anyone knowing or being able to access. With everything fine tuned and the crown molding re-installed we were able to call this project wrapped. It was one of my favorite projects in recent memory for sure and is just a very classic look that will be in style for a long time.
Thank you for reading, and if you haven’t yet please subscribe so you can be notified whenever we post a new article or upcoming news!
2 responses to “Step-by-Step Guide to Building Custom Electric Fireplace Entertainment Center with Brick Veneer”
-
Thank you for the EXCELLENT write- up on crafting an entertainment center wall that includes an electric fireplace! We are adding the same to our new build and have scoured the internet for information that will help us understand and design the project. Your article provided us, by far, with some of the best information we have come across to date.
LikeLike
-
Thank you, we have been building custom pieces like crazy lately. But we will soon be getting back to our build recaps and YouTube videos!
LikeLike
-
Discover more from CRAFTED IN FLORIDA
Subscribe to get the latest posts sent to your email.

Leave a comment