
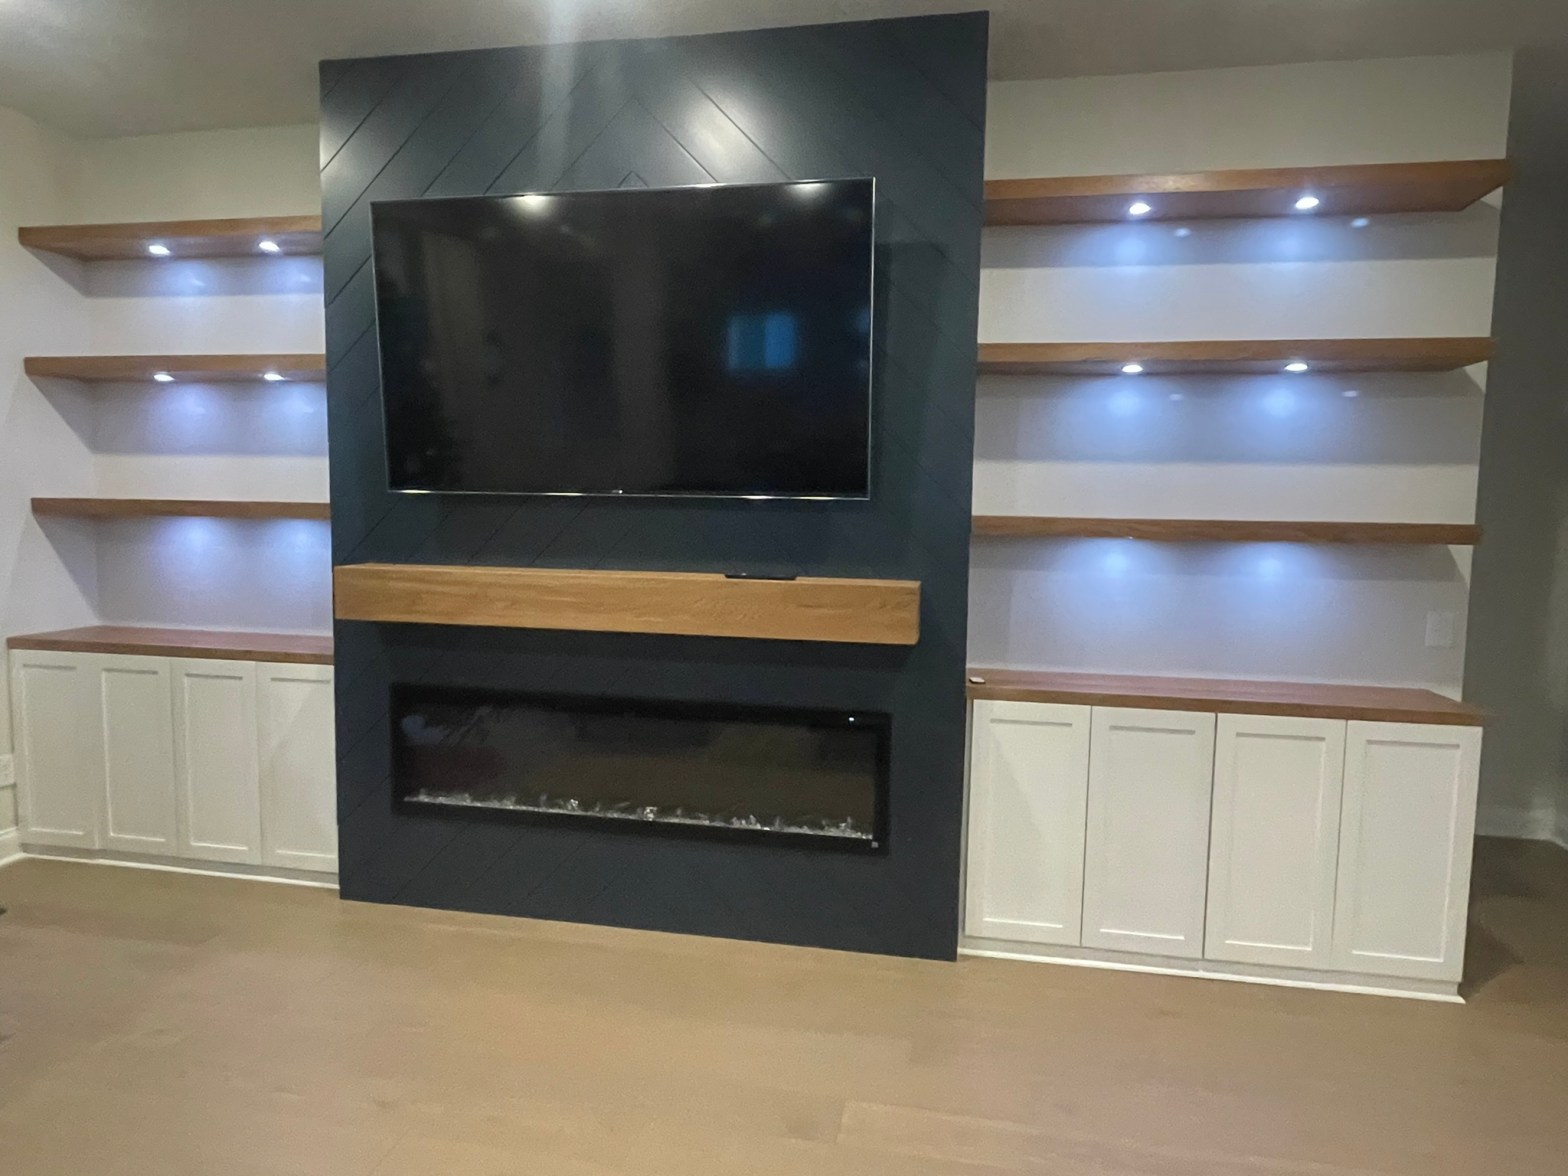

The Design
The design for this project began like most projects, with a picture from the internet, most likely from Pintrest. The client wanted a shiplap fireplace with some wood stained shelving, some cabinetry for storage and a custom mantle. The original plan consisted of horizontal shiplap, but the client found another picture with the chevron style and wanted to add that feature. The lights also were something that the client wanted to add in order to bring a little more pizazz to the piece. The shiplap not only was going to have the chevron look on the front but as it turned the corner the shiplap would turn back up to give it that “V” shape. Now it was time to figure out how to bring this vision to life.
The Process
My first step in building this project was to build the cabinets. I build these custom cabinets the way I typically do; beginning by breaking down the plywood to the appropriate depth. Once the pieces are cut to size I add a 3/4” dado (⅜” deep) on the inside of the side panels to at the height I want my bottom panel to sit. Then I change out the dado stack for a ¼” wide dado, and rip the dado one inch from the back of each piece that will receive the back panel of the cabinet. Once all of the dados are cut I cut some nailers out of the leftover plywood and use some glue and a nail gun to attach these to the tops and backs of the cabinets, then later I drove in some screws for additional support.
Now that the cabinets have been assembled, I take the S3S white oak and rip them to size and plane them smooth. I then can take the pieces and add some biscuits for alignment and glue the pieces together. I was using twelve foot boards so I glued the entire piece together and would come back later to cut it into two five foot countertops. The remainder of my white oak I cut to size for the floating shelf faces. The shelves on the left side of the fireplace will be between a wall and the fireplace, while the shelves on the right side will need an outside miter since the outer edge will be visible. Once the pieces are ripped to size and cut slightly over final length I break down some ½” white oak plywood. I take these pieces and add a five degree bevel on the edge that will be glued to the face of the shelf. This bevel will allow for a cleaner connection to the shelf face, and a space for the glue to sit.
Assembly of the shelves consist of spacer blocks added to the middle and drilling the holes for the lights to be added. I then glue and add some pin nails to hold the piece together while the clamps are added and then the glue can dry. The install for these shelves will require additional 2×2 lumber cut to size and ripped to the appropriate thickness, and for the shelves that won’t have a 3rd point of connection (the outside corner) will get a metal “L” bracket for additional support.
The next big thing that needs to be accomplished is the doors for the cabinets and the finish completed. I have another article and YouTube video on how I make shaker style doors if you need that information. (How to Make Shaker Style Cabinet Doors in 4 Minutes!) I will do a video and article soon about my finishing process, but until then just know that this is the point to where the finishing needs to be done. When everything is prepped and ready for install, I can then begin framing out the fireplace unit. Things that need to be considered when framing is the location of the TV for additional blocking and the size of the fireplace. I also ensure that there is framing where I know there will be seams so that I can have a smooth connection and there is no play in the joints.
Installation of the shiplap is fairly simple once you get the hang of the corners. I pre-paint all of the shiplap to make it easier once it’s all installed to finish it. I begin the installation by setting my Cigman (link) laser level to the center of the fireplace so I have a middle point where I can make sure the center joint is consistent all the way up the fireplace. I start on the bottom adding a 45 degree miter on two pieces and get my first two pieces ready for install. I then take that joint and cut biscuit slots on both pieces to accept a biscuit to ensure we have perfect alignment on that joint. From there I can work up the fireplace, cutting around the actual fireplace unit, until I get to the first outside corner. Cutting the outside corners requires a compound miter. A compound miter is when you turn your miter saw to a 45 degree miter and then add a bevel, which in this case is also 45 degrees. The compound miter allows the shiplap to turn the 90 degree corner and then also turns 45 degrees up to create the “V” shape at the corner.
Once I get that alignment correct I can then basically rinse and repeat. The time consuming portion is getting the correct measurement for each piece to make tight joints against the drywall. Once everything is installed I fill any nail holes and joints that weren’t completely tight. Finally the mantle is installed after touch-up paint is complete, the lights are run after a hole is drilled through the shelf framing. The lights are controlled via an app and all of the wiring is secured behind the fireplace. The fireplace is installed with a few screws and it’s time to step back and admire the work.
If you enjoyed this or learned something please like and subscribe here and the Youtube page to stay up to date on all of the Crafted In Florida Build Recaps.
Discover more from CRAFTED IN FLORIDA
Subscribe to get the latest posts sent to your email.
